¶ Ways to Connect to WatchMon via WiFi
There are different ways to connect to your WatchMon via WiFi:
- Connect the WatchMon to WiFi AP via the WatchMon Toolkit
- Connect Directly to the WatchMon using WiFi
Note: If you wish to connect via WiFi, make sure your WatchMon is connected to a power source between 8 and 30v DC or powered via USB using the cable provided in your starter kit.
¶ Connect to WiFi AP via the WatchMon Toolkit
Have the WatchMon device join the WiFi home router.
¶ 1. Go to Menu then click on Tools.

¶ 2. Click Join WiFi AP.

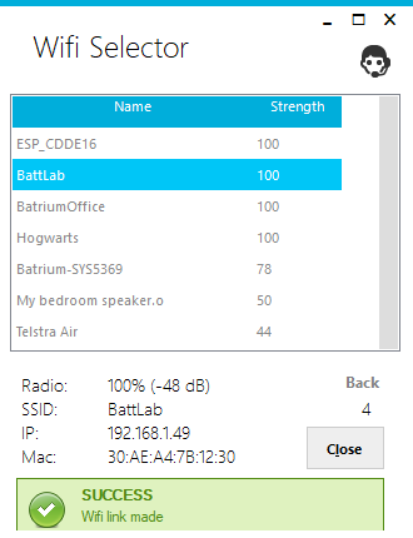
¶ 3. Select your WiFi network/home router.
- Select WiFi Access Point.
- Input Password.
- Click the "OK" button.

¶ Can't see any WiFi network list to connect?
In some cases, if you can't see your WiFi network list, close this window, then click on your computer's WiFi network (see picture below).

This will refresh/update the Windows WiFi network list that your computer is detecting. Go back and start again from the first step of this guide. You should be able to see all WiFi networks listed normally.
¶ 4. Successful connection to WiFi AP.

¶ Confirm the Connection and Set WiFi as Default
Once the connection to WiFi is successful, you can now confirm the connection and set WiFi as the default connection of the WatchMon.
Follow the additional steps below:
¶ Click on the USB icon on the left bottom corner (Status Icon).

¶ Open the Connection Selector window.
The connection selector is where you can choose to connect to your WatchMon via USB, WiFi, or MQTT or none.
.png)
¶ Change method from USB to WiFi.

¶ Choose the WatchMon device.
Click on the highlighted arrow on the left to select which WatchMon you would like to connect via WiFi (in case you have more than one WatchMon in your network) to default.
Click on "Connect" then close the window.

¶ Verify WiFi Connection in the Chart

Notice that now there is a "WiFi" icon instead of USB icon and you should see the heart icon pulsing. This indicates that your system is live and properly talking to your WatchMon hardware and is now successfully connected to WiFi.

¶ Connect Directly to WatchMon via WiFi
This will make a direct connection between your computer and the WatchMon, very similar to a direct USB connection but using the WiFi instead.
Note: This method is for recovery/emergency only.
You won't have internet access in this mode as both the computer and the WatchMon WiFi will be busy talking to each other. With direct access, the BMS will not be able to connect to the router at the same time.
¶ 1. Open your computer's WiFi Network list.
You should find your WatchMon WiFi broadcasting on your network list.
Click on "Connect".

¶ 2. Enter the password.
Enter your PIN number/code located on the back of your WatchMon hardware.

¶ Where do I find the PIN code?

In this example, the PIN code is 987654.
WiFi password will be "pin" (in lowercase) + your PIN number = pin987654 (in this example).
¶ 3. Click on Menu then go to Chart.
This will take you to the main screen.

Notice that now there is a “WiFi” icon instead of a USB icon and you should see the heart icon pulsing. This indicates that your system is live and properly talking to your WatchMon hardware.

¶ Troubleshooting the WiFi
¶ Software & Firmware Mismatch
If there is a software/ firmware mismatch the following will be displayed. There is a firmware upgrade process documented below.

¶ 2.4Ghz and 5Ghz Network
If you have a WiFi router with 2.4 Ghz and 5 GHz, both with exactly the same SSID name, the BMS will not be able to scan for it. The BMS gets confused about where to connect as there are two. It will not find it.
Please know that the Batrium BMS can only connect to 2.4Ghz.
¶ WiFi Name
You can also try changing the name of the WiFi you are trying to connect to.
¶ Type and Press Save
Try directly typing in the WiFi name and pressing save.
¶ Check the SSID
Make sure your WiFi router has a sensible SSID. If you use apostrophes, spaces, etc, this sometimes cannot be read by the system.
¶ Check device connections
Check whether you have a very basic router. It's becoming more and more common for people to have 12-15 devices connected to their network and they will only have a maximum of that number. If you exceed, it will reject the connection unless one device drops off.
¶ WiFi AP and Router
Once the device has connected to a router, it will turn off the AP to ensure security. It is only enabled for the first 5 minutes whilst it cannot connect to the device. It cannot support connecting to the AP and router all at the same time.
¶ WiFi Signal Troubleshooting
Above is an article related to a generic troubleshooting guide for fixing WiFi signal.