¶ WatchMon4
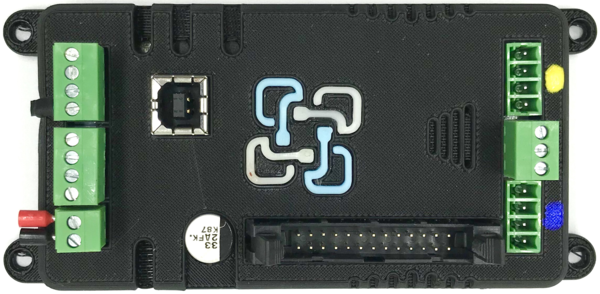
The WatchMon 4 (WM4) is a recently phased-out Batrium battery supervisor. The newest supervisor is called the WatchMonCORE.
The WatchMon 4 (WM4) communicates with a range of different cell monitors making it extremely configurable and flexible.

The following revisions of the WM4 are outlined below:
- WM 4.0 - WM4.1
- WM 4.2
- WM 4.3 - WM4.4
¶ Features
- Processor: ESP32 more powerful than WM1
- Data logging of key metrics for 10 years
- Clock with a backup battery
- Optional over the air (OTA) upgrades to firmware
- Upgrades firmware via USB
- Secure web encryption to allow SSL link when connecting to optional cloud portal via MQTT.
- Prevent all outputs from resetting when the processor firmware is updating (no transient on/off/on)
¶ BMS Module Connectivity
- Serial link to SoC% current sensor module
- Serial link to isolated CellMon modules
¶ Remote Communication
- WiFi connectivity (normal, disabled, or read-only)
- Can-Bus communication port to remote systems
- Modbus rs485 link allowing connectivity to inverters without canbus
- Optional blue-tooth connectivity (future enhancement)
¶ Built-in Input and Output Control
- Two (2) onboard FET outputs 4A with 8A inrush (e.g. remote circuit breaker trip + fan)
- Two (2) onboard inputs (e.g. circuit breaker trip sensor)
¶ Expansion Board Compatible
- Only required when additional functionality is required
- 26 pin IDE ribbon connector:
- 5 Digital inputs
- 2 Analogue inputs
- 1 Pulse counter input
- 8 Digital outputs (4 FET + 4 Relay)
- 2 Digital output PWM
- NeoPixel LED control
¶ Power Input
- Built-in 8v to 65v DC-DC supply
- Handle automotive transients
¶ Ease of Use
- Pluggable screw terminals to simplify installation, allowing pre-made cables for both shunt and cellmons
- Relocation of onboard temperature sensors away from heat sources to have better representation of ambient conditions
- Finger guard cover clip slots, more coming soon
- Intuitive screw terminal labelling to reduce the need to check the documentation
¶ Dimensions
- Length 107 mm x Width 55 mm
¶ Software
WatchMon4 requires the latest release of WatchMonToolkit.
¶ CMU Connect
¶ How to: Connect CellMon Modules to the WatchMon4
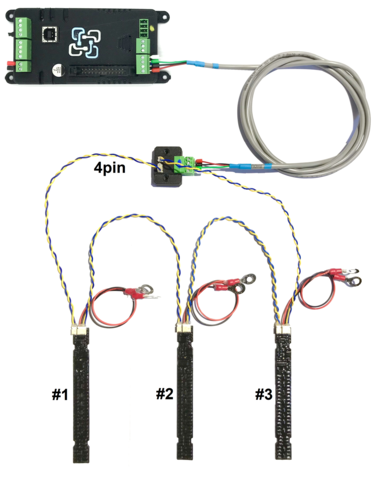
1. Connect the CMU cable (grey cable with blue heat-shrink) to the blue indication painted on the WatchMon4 cover as per the images below:

*This is the blue indication on the WatchMon.

¶ Why do I need the CMU cable?
The CMU cable allows the WatchMon hardware to be installed at a higher and unobstructed position outside the battery box. This also improves the WiFi signal significantly.
It makes connecting the CellMons much easier and more intuitive, using the existing connectors rather than having the risk of connecting something wrong and damaging the WatchMon or CellMon hardware.
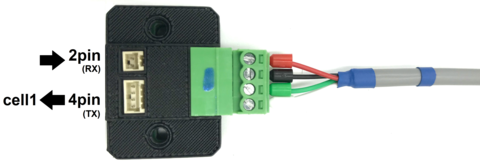
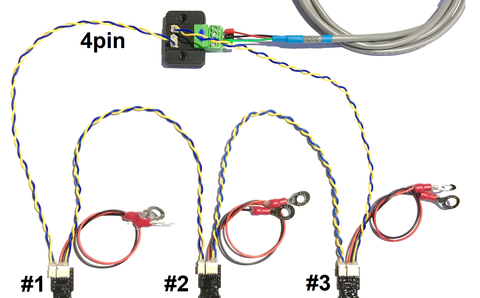
It is recommended to start by connecting cell #1 (the most negative battery) to the 4 pin CMU cable connector (small black box highlighted in the photo below).
Then, work up the chain to the most positive battery, finishing the chain back on the 2 pin CMU cable connector.

CAUTION: Whilst preparing the cables for insertion into the WatchMon terminals, ensure that both the 2 pin and 4 pin connectors are not connected to the cell monitors until after you have prepared the cables.
On the initial setting up of the cell monitors, make sure to only have the USB plugged in and then attempt to connect the CellMon wires. We recommend that you disconnect the WatchMon power supply (2 pin connector) and all other cabling until you have successfully connected the CellMon network. Ensure that the software network testing utility has confirmed that the communication link is working properly.
¶ Closer Look of the CellMon Daisy Chain:

¶ WM4 Documents & Resources
- SETUP: Simplified Watchmon4 Starting Guide
- WatchMon4 Hardware Guide And Pin Assignment
- Pin Assignment Changes - CANbus and Mosfets
- WatchMon4 Wiring Diagram
- WatchMonPlus or WatchMon 4