
This page outlines the configuration in the WatchMon software and SolarGo (GoodWe) app using the Batrium CANbus protocol emulator for a HVM/HVS battery.
¶ WatchMon Configuration
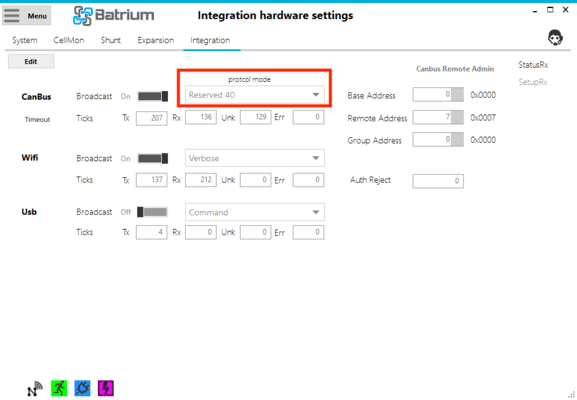
To emulate the BYD HVS, use the “Reserved 40” CANbus protocol option in the WatchMon software (minimum release build requirement is 2.17.46). When updating, please make sure the firmware is updated to match the current software release.
On the Control Logic > Remote tab, set your preferred voltage targets and current limits.
The current limits will need to be less than or equal to the limits of the select BYD HVM/HVS battery eg. 40/80A/120A for HVM/HVM*3/HVM*3 respectively.
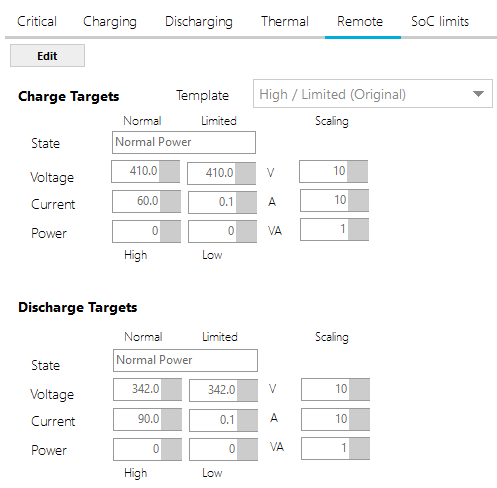
We typically recommend using the ‘Ramped’ template.
¶ GoodWe SolarGo App Configuration (v5.0.7)
¶ 1. In the SolarGo app, after selecting your inverter you need to select the > More button and then the Quick Setting option (or Basic Setting option in SolarGo versions before 5.0.7).
Make sure to run the mini version of the app and the required minimum firmware of the inverter.

*We are still confirming the required minimum build of the inverter.
¶ 2. Enter the inverter password at the Installer login.
¶ 3. At the Safety code screen and Connect Mode screens (if shown for your inverter), select Next.
¶ 4. In the BAT Connect Mode screen, select the appropriate option based on the number of battery connections and HV packs you are connecting to the GoodWe inverter.
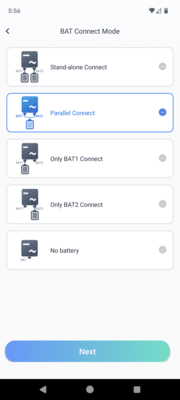
If you have one battery but connecting to both battery terminal pairs, you can select the Parallel Connect option. You will need to connect a CAN communication cable between the WatchMon and the inverter.
Before selecting your preferred BYD battery option in the next screen make sure that you complete the CANBUS configuration of the Watchmon integration section by setting the Protocol mode to "Reserved 40" and the Remote Address based on the voltage of the pack where each unit is ~58V i.e. for a 410V pack enter a Remote Address of 7, a 230V pack would have a remote address of 230V.
Additional points:
- Typically to find the HV options, you need to have more than 200V. If less than 200V, it will only show the LV options.
- You have to set up the BMS properly first. It needs to be — not in error, not critical, ok to charge, ok to discharge (not red critical); essentially all are NORMAL. You also need to make sure the targets are appropriate.
- IMPORTANT: Restart the inverter after setting the parameters for it to recognize the battery pack.
¶ 5. On the next screen, select the appropriate BYD HVM or HVS option.
Note that the HVM option has a 40A current limit for charging and discharging, HVM*2 has an 80A 40A current limit for charging and discharging and the HVM has a 120A 40A current limit for charging and discharging.
You should choose the appropriate option to ensure you can charge up to your pack's maximum current limit (eg. for a pack with a 100A limit you should select the HVM*3 option and then set the 100A limit in the Watchmon software.
If you choose a BYD battery configuration with a lower limit e.g. 80A then the inverter will not charge or discharge above the 80A limit regardless of the Remote charge limits you set in the Watchmon software.
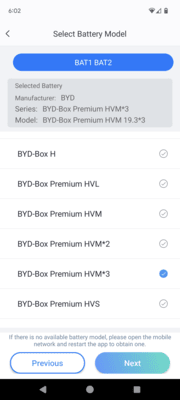
If you do not have the correct HV battery pack, these options will not be available.
¶ 6. After selecting the battery you should receive a confirmation that the selected battery has been setup successfully.
That ends the configuration for the selected battery. You can continue past this screen to set charging modes as desired.
¶ Successful Integration Checklist
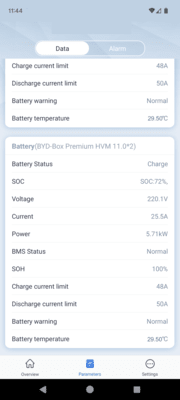
To make sure whether the integration has been successful, make sure to check the accuracy of the targets of the following:
¶ On the inverter app:
¶ On the BMS:
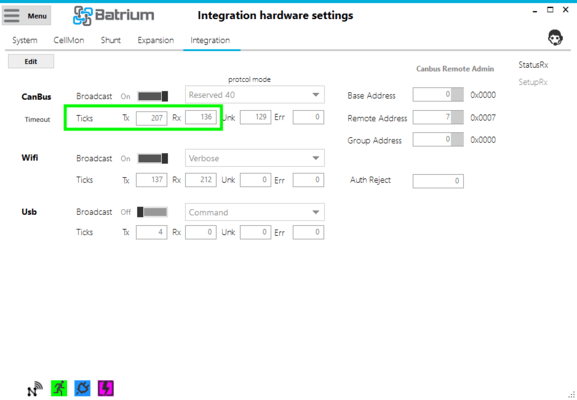
- Rx/Tx for CANbus monitoring is incrementing
- Battery Temperature
- Battery SoC%
- Shunt Readings (Voltage and Current)
- Target Limited for Charging (Voltage and Current)
- Target Limited for Discharging (Voltage and Current)
- Alert and Warnings Codes
