¶ Bypass Test
Bypass Testing is about simulating what occurs when the cells are balancing to ensure everything is working.
During this procedure, the WatchMon will test every CellMon’s balancing resistors, one by one for a few seconds.
You should notice the LED turning ON and the temperature increasing about +/-5 degrees then proceeding to the next CellMon in the chain.
Each device is progressively run to warm up during the testing session to confirm that the bypass function works. The verification test is aimed at BlockMons, LongMons, and LeafMons rather than the CellMate-K9 since these do not have heatsinks attached and are much easier to detect a thermal change.
¶ 1. Click Bypass Test in the Setup Checklist
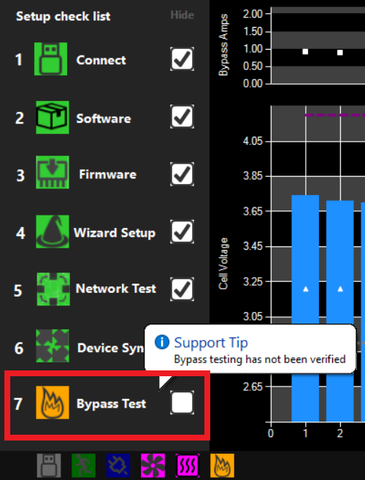
Or access via the Hardware option on the Menu, then choosing the CellMon tab and click Bypass Tester.
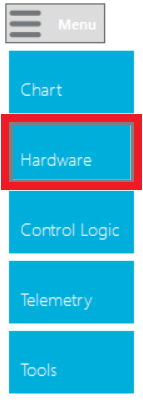
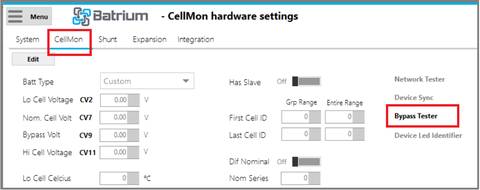
¶ 2. Start the Bypass Test
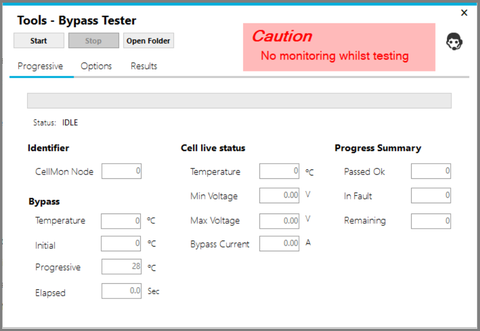
¶ 3. Testing in Progress
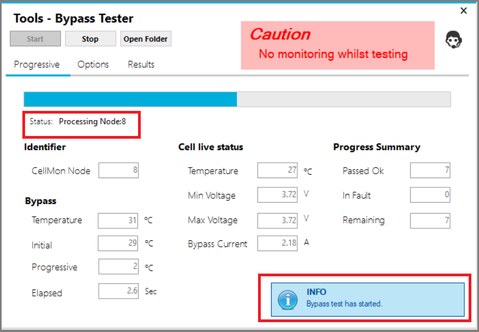
Status will display the current Node being tested.
On this image sample, CellMon Number 8 is being tested.
¶ 4. Bypass Test Results
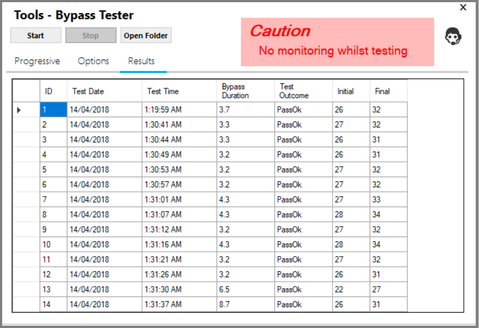
See the Result Tab after Bypass Test.
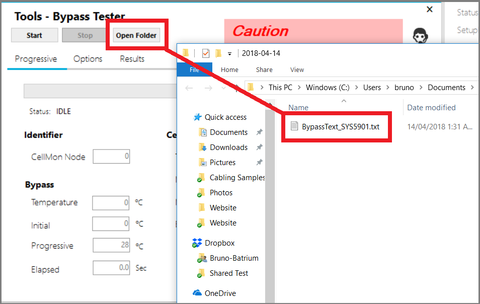
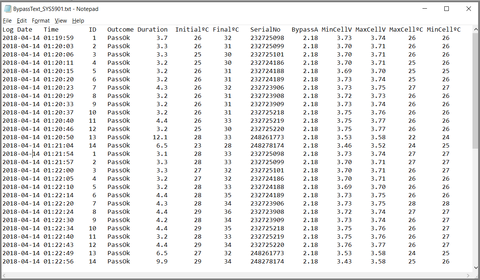
All Bypass Test results are saved in a folder for future reference.
If you see the green "Successful Bypass Test" message, you have completed the 7 Setup Check List and you will now see the information in full screen.
¶ Video: Bypass Tester Explained
The linked video explains the details of the Bypass Tester.
¶ Bypass Testing the CellMate-K9
¶ Bypass Testing When Needed to Verify the CellMate-K9 Device
This is not required as standard procedure, and only used to verify if there is a hardware issue.
Since the CellMate-K9 has an efficient heatsink, this makes it far harder to warm up when only one cell is bypassing especially as the device gets further from the ambient temperature.
If hardware testing is required, consider the following adjustments to the Options tab and how you run the test:
- turn off the bypass fan if attached.
- only run a few cell channels at a time.
- wait till the heatsink returns to ambient before running more.
- put a blanket against the heatsink to disable its ability to release heat.
Note: Bypass Test requires ambient temperatures above 10°C.
¶ Bypass Tester - Options
Administrative screen for the WatchMon supervisor hardware, and how to understand the various fields available for Results of a Bypass Test.

This screen is accessed via the Hardware option on the Menu, then choosing the CellMon tab and pressing the Bypass Tester link and on the Options Tab.
¶ Objective
To set the Nodes, thresholds and Limits to be used to run the Bypass Test.
¶ Field Definitions

¶ First Node ID
- Identification of First Node in the range used for Bypass test.
¶ Last Node ID
- Identification of Last Node in the range used for Bypass test.

¶ Lo Cell Voltage
- Minimum Voltage at which Bypass Test can run. Only available in Advanced mode.
¶ Hi Cell Voltage
- Maximum Voltage at which Bypass Test can run. Only available in Advanced mode.

¶ Bypass Increment
- Temperature increment used for Bypass test. Only available in Advanced mode.
¶ Start Minimum
- The test will not start if the temperature is below this. Only available in Advanced mode.
¶ Maximum Finish
- Test will cease if the temperature reaches this. Only available in Advanced mode.

¶ Bypass Current Limit
- Test will cease if current reaches this. Only available in Advanced mode.
¶ Bypass Time Limit
- Test will cease if time reaches this. Only available in Advanced mode.

¶ Bypass Tester - Progressive
Live screen for the WatchMon supervisor hardware, and how to understand the various fields available to run a Bypass Test.

This screen is accessed via the Hardware option on the Menu, then choosing the CellMon tab and pressing the Bypass Tester link and on the Progressive Tab.
¶ Objective
To monitor the state of the batteries during the Bypass Tester. This screen shows the progressive data as it occurs whilst the node is being tested.
¶ Field Definitions

¶ CellMon Node
- CellMon Node number being tested.

¶ Temperature
Current temperature of the CellMon in Bypass.
¶ Initial
Initial temperature of the CellMon in Bypass.
¶ Progressive
Progressive temperature change of the CellMon in Bypass.
¶ Elapsed
Progressive time the CellMon has been in Bypass.

¶ Temperature
Live Status of Temperature.
¶ Min Voltage
Live Status of Minimum Voltage.
¶ Max Voltage
Live Status of Maximum Voltage.
¶ Bypass Current
Live Status of Bypass Current.

¶ Bypass Tester - Results
Results screen for the WatchMon supervisor hardware, and how to understand the various fields available for Results of a Bypass Test.

This screen is accessed via the Hardware option on the Menu, then choosing the CellMon tab and pressing the Bypass Tester link and on the Results Tab.
¶ Objective
To view the results of the Bypass test once it has been completed. This screen shows the data for all cells being tested.
¶ Field Definitions

¶ ID
- Node ID for the CellMon.
¶ Test Date
- Test Date that the Bypass test occurred for the CellMon in Bypass for the Node.
¶ Test Time
- Time of Day that the Bypass test occurred for the CellMon in Bypass for the Node.
¶ Bypass Duration
- Length of time in seconds of the CellMon in Bypass for the Node.
¶ Test Outcome
- Pass or Fail of the CellMon in Bypass for the Node.
¶ Initial
- Initial temperature of the CellMon in Bypass for the Node.
¶ Final
- Final temperature of the CellMon in Bypass for the Node.

¶ Action Button / Process Link Events

- Start: Starts bypass test. Available when Bypass test not in progress.
- Stop: Stops bypass test. Available whilst Bypass test in progress.
- Advanced: Allows editing of more advanced fields. (Results screen for the WatchMon supervisor hardware, and how to understand the various fields available for Results of a Bypass Test.)